Since I bought my FJ600 last July, I have replaced the battery, regulator, turn signals (all four, twice), clutch cable, throttle cable, speedometer cable, front fender, both tires, chain and both sprockets, rubber peg covers, rubber shifter cover, left-side body panel, ignition key, gauge cluster, rear brake pedal, spark plugs, and muffler. The only non-cosmetic problems left are a minor oil leak in the valve cover gasket and another in the oil filter assembly. This is excellent condition for a motorcycle made in 1984!
The bike’s sluggish performance on my recent weekend trip to Eastern Washington left me thinking it was time for something newer. Now that the new muffler has smoothed out the engine’s power issues, however, I no longer feel so much like I’ve outgrown it. Maybe it’s time to clean it all up and give it a paint job.
My bike came with a beat-up little slip-on muffler which had never been adequate for the size of its engine and had in any case long moved past its prime. I looked into replacing it, and the custom 4-1 header, with stock parts from eBay, but costs were daunting. I finally bought a muffler up at Bent Bike, stock part from a wrecked ’94 FZR 600; same size engine and reasonably similar geometry, so I figured it ought to work.
This weekend I finally made time to drop the bike off at Felony Flyers; three hours later, Steg had fabricated a pipe adapter, welded it on, bent and cut some flat stock into a bracket, and bolted everything on. Steg is great like that.
Now that it’s done I wish I’d made this project more of a priority. It had never occurred to me that the distinctly frustrating dead spot in the bike’s power curve right around 6000 rpm was not some flaw in the carburetor tuning or some consequence of the engine’s age, but simply caused by the bad muffler! Why did I put up with this for so long? Same bike, same engine, now with smooth, quiet, powerful acceleration all the way up the range. No more need for all this jackrabbitting up to high RPMs just so I can downshift without bogging down…
What’s more, I hadn’t realized just how awesomely noisy my bike was. I am embarrassed, now, to have subjected friends and neighbors to that racket for so long – I simply hadn’t realized there was anything out of the ordinary.
Comments Off on
I went by Danger House last night to look at the first full end-to-end test of the Groovik’s Cube hardware. The electronic components made a complicated sight, plugged together in a nest of wires and ziptied together onto a big pegboard; at the far end of the wiring, a scaffold cube supported one five-foot square of ripstop nylon, glowing brightly as an LED trio illuminated the interior reflecting surface. It’s fun to watch just by itself: with nine of these per face, fifteen feet on a side, suspended some eight or ten feet off the ground, it’s easy to imagine the finished cube being one of this year’s notable Black Rock City landmarks.
My part of the project is a set of twelve-channel Arduino-based dimmers. Red, green, and blue each count as one channel, so each dimmer manages four of the cube’s fifty-four facets. The central computer controls the dimmers via USB, and each channel’s output is a logic signal feeding into a power module. The power modules, in turn, govern the brightness of the LEDs. We could definitely solve this more cheaply if we delegated the PWM control to dedicated LED driver chips, but this solution is simple and does not require any custom circuit boards. We just buy a bunch of Arduinos, upload my driver software, and plug everything together. I’ll do some experimenting now that we have a working solution, but as much for my own interest as anything.
Comments Off on
I haven’t gotten a good picture of the new LED taillight on my FJ600 yet, but it’s pretty bright. I can’t see it while I’m riding, of course, but it’s using 20-degree LEDs aimed just slightly above the horizontal, so it should do a good job of getting the attention of the driver behind me.
I will leave this unit installed, since it is a good auxiliary brake light, but the point was to prototype the full replacement taillights I want to build for Adam’s bike and my Maxim. It is clear that I will need a mixture of wide- and narrow-angle LEDs, perhaps a curved mounting surface, and possibly a diffusing screen.
Comments Off on
Today, I:
– finished programming the arduino LED driver
– went on a motorcycle ride
– replaced the turn signals and brake pedal on my FJ600, readjusted the clutch, bolted on a strip of LEDs which will eventually be an auxiliary brake light
– hung out at ATC for a couple hours planning the groovik’s-cube project
It was a good day.
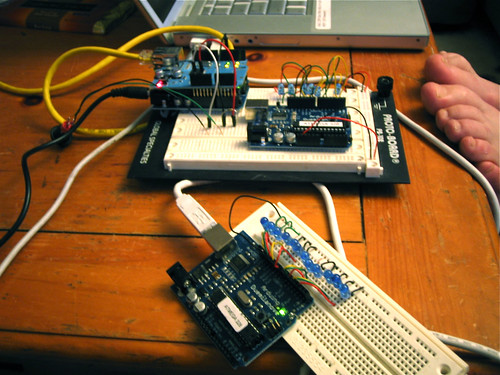
Foreground board is my 4-channel, 24-bit RGB controller. Middle board is Barry’s UI interface. To the left, with the yellow cable, is the ethernet interface which connects the whole system to the computer. The production system will use a gumstix linux machine, but for now the software (in python) is running on Barry’s Macbook.
Comments Off on prototype grooviks cube electronics chain
Today’s project is the software for a microcontroller-based LED system for the grooviks-cube project. We’re using Arduino boards; each board will drive four RGB channels, and a central computer will control the arduino boards via USB. Four channels times three components equals twelve individual outputs; the board will drive an LED at each output using PWM, which basically means flipping the current on and off faster than the brain’s persistence-of-vision threshold. The ratio of on-time to off-time determines the apparent brightness. The controller basically spends all of its time in a loop, flipping lights on and off, in order to maintain the right ratios of brightness and thus the right color.
The project is a lot of fun, and it’s reawakening my interest in interesting blinky electronic stuff. The Arduino board is an Atmel chip with an FTDI TTL->USB interface, power regulation, a timing crystal, and all the other stuff you need so that you literally just plug in a USB cable and go. Programming it consists of typing in your code and pushing “upload”; the board resets, reprograms itself, and runs your new program. Couldn’t be any easier.
Comments Off on
This guy used a light meter to measure the brightness of his car’s taillight and his bike’s taillight, intending to build a new custom LED taillight. I’ve been thinking about custom LED taillight designs for my old Maxim, and for Adam’s Katana, so this is interesting data. He includes build photos for the project.
Comments Off on